The Evolution of My Pistol Shooting Stance

I was looking at photos of people shooting, and I noticed the different ways people hold their guns when shooting. This got me thinking about how my own shooting stance has changed over time.

Here is a brief history of my shooting stance.

The Dueling Stance

This is the classic one handed bullseye stance. The shooter aims along the arm, and puts one hand in their pocket. I have no idea if this is still being done, but if I had to guess, it probably is, by bullseye competitors.

I’ve played around with this stance on occasion, but I don’t have the arm stamina to do it effectively. However, if I did need to do it, I would just get some training and practice.

The good news is I don’t have much reason to use this stance. I don’t shoot bullseye and I don’t settle quarrels with a duel.

Weaver Stance

This stance was the major stance in use in the early days of Practical Pistol. A lot of more experienced shooters still use this stance. A lot of Hollywood people who don’t have a good instructor use this stance, some of them using the Teacup method with the support hand.

R. Lee Ermey uses the Weaver stance. This is interesting, because the military taught a one-handed shooting style with the 1911, up until adoption of the Beretta M92 in the 1980’s.

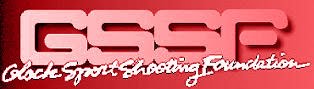
I used the Weaver stance early on, because it gave me a better view of the sights. The gun is closer to the eye. It also turns your body a little bit, which stabilizes you against the recoil. Proponents also say it presents a smaller target to the bad guy, but to me that assumes you are standing there shooting at a bad guy, and not running like hell to get away, like you should be.
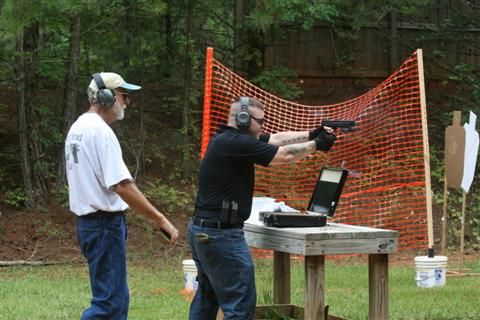
Isosceles Stance

This stance is named for the triangle that the arms make when holding the gun in front of the shooter. It was pioneered by Brian Enos and Rob Leatham in the 80’s.

I noticed that a lot of shooters used this stance, and I tried it a number of times. Some of them lock their elbows, like Dave Sevigny, and some leave the elbows a little bent, like Doug Koenig. I tried it both ways.

But because it was uncomfortable to me – that is, unfamiliar – I quickly went back to the Weaver stance.

On a couple of practice occasions, I decided to see how accurate I could be with each stance. I found out that I was a lot more accurate using the Isosceles stance than the Weaver, and I mean a lot more accurate. I think it has to do with the variability of the hold. In the Weaver I kept my strong arm a little bent, and I think this led to differences from shot to shot.

After a few sessions, I finally convinced myself to switch to Isosceles. It wasn’t easy – no change ever is. But it’s paid off for me.

Now, I occasionally find myself back in the Weaver stance, for no apparent reason. Habit I guess.

My point of all this is to say, try all the stances. Don’t use a stance just because you think it looks good on Jack Bauer. Use what works. And if people give you grief, let your score do the talking.

Match Report

Photo courtesy of River Bend Gun Club Action Pistol group

Saturday July 16 was quite a shooting day. I had planned on shooting the GSSF match at the River Bend Gun Club in Dawsonville, Georgia, and I found out late in the week from Staci Boudreau, a fellow shooter on Twitter, that the club’s monthly Action Pistol match was also held that morning. So I met Staci and her husband Bruce at RBGC for a full day of shooting.

The River Bend Gun Club, RBGC, is a very well kept and well run club located a few miles off I-575 about 50 miles north of Atlanta. I first shot there as a guest of a co-worker a few years ago, and it’s only gotten better since. I’ve shot GSSF and USPSA there, and now Action Pistol.

The RBGC Action Pistol match is very much like the matches I first shot in Alabama 18 years ago. It’s not affiliated with any organization like USPSA, which gives them a lot of freedom in stage design, gun classifications, and the like. I shot Production class, because that’s what I shoot in USPSA, and I wanted to keep the more frequent magazine change as a part of the test. Oh, I was tempted to shoot Limited, since I could have loaded my magazines to 19 and blazed away. Maybe next time.

First, I think the safety briefing that was given was about the best briefing I have ever had. He went over all the rules of the match, and all the safety points. Nothing was glossed over, that there was no assumption about anyone’s previous shooting experience. It was presented with ease, and no one seemed anxious to move on. Very refreshing.

Also refreshing – literally – was the weather, around 75 degrees at the start of the match, and drizzling most of the time. Shooting a Glock, all I had to do was wipe off my grips before shooting. The weather started to dry up by the end of the match, though.

There were three stages, and each tested different shooting skills. The first stage was all steel plates, either classic round plates, steel bowling pins, pepper poppers, or steel IPSC targets. You either hit or not, and it all came down to time. The second stage was classic run and gun, with an added twist – the last series of targets included one target that had a badge around its neck, representing an undercover policeman, and the ROs changed which target was the LEO before each run. At least one shooter in our squad shot the cop.

Stage 3 took advantage of the non-USPSA rules, in that it only required shooters to neutralize the targets, which was defined as one shot in the A area, or 2 in the B and/or C area. Shots in the D range just made the target angry. There were several shots around barricades, and if you aimed center of mass and saw an A hit, move on.

There were unpleasant surprises, though, as some shooters received Failures to Neutralize, because they assumed a single headshot was a neutralizer, not seeing that they had actually hit the B area in the head.

After that, we enjoyed a great hamburger and hotdog lunch, then headed up the hill to the Cowboy range, where the GSSF match was already under way.

After signing in, we shot the three stages I talked about last week. I shot a very good match for me, with zero misses except one steel plate left standing. My score was 121 seconds and change, which is a 15 second improvement over my personal best.

Bruce shot a lot better than I, with a score of 83. Well done.

I arrived home about 4:30, after leaving the house at 7 AM. A quick peak as I cleaned out the car revealed that my Glock didn’t really need cleaning. I just brushed out the trigger group, ran a rod brush through the barrel, and put him away. The Glock 19 I took as a backup got the carry loads back in, and went in my waistband.

The GSSF scores will be posted later today, Monday, and in a few weeks, the prizes will be awarded. But believe me, before then, we’ll be back on the range.

Glock Sport Shooting Foundation

I am surprised when I talk with fellow Glock owners who are unaware of the Glock Sport Shooting Foundation, or GSSF. I then realized I hadn’t done a full post explaining what this organization was or how to join. Let’s correct that today.

The GSSF is owned and operated by Glock, Inc., out of their US headquarters in Smyrna, Georgia. They organize and run about 36 matches a year, all over the country, with the much appreciated assistance of a lot of people at local host ranges. The schedule can be found at the GSSF website, www.gssfonline.com. Joining GSSF is just $35 for the first year, and $25 to renew, plus $25 per match for each pistol you compete with. (More on that later.)

But the bounty comes with the prize packages. In addition to awarding Glock pistols for winners, and cash for other high finishers, they also award a lot of cash, complementary membership renewals, and free pistols at random to competitors. In the 15 years I’ve been competing, I have only won a prize once for my finish – I won $100 for taking second in my class. But I’ve also won $100 once, $50 twice, two annual renewals, and – YES – a brand new Glock of my choice. (That’s where Libert, my G19, came from!)

GSSF is open to any Glock shooter, regardless of age or experience. There are different classifications for shooters, ranging from Amateur Civilian (which would include most of us), to Guardian (for police and military) to Master (for those who are ranked Master or Grand Master in other groups). All you need is a Glock pistol and at least 4 magazines, plus 104 rounds of ammo. And, if you have more than one pistol, you can enter more than one classification, which increases your chances of winning a random prize.

Admittedly, GSSF seems like a rather low-intensity competition, when compared with USPSA or IDPA. There are no reloads or movement during the stages, and the stages start at low ready, rather than being drawn from a holster. This is perfect for the new shooter, but don’t think it makes matches a cake walk for experienced shooters. This just shifts the emphasis from transitions to accuracy.

To level the playing field, and to account for the restrictive gun laws in some states, all magazines start with 10 rounds, and you are allowed one in the chamber. There is an exception for the Glock 36, which only holds 6 rounds to start, in a class called Heavy Metal, and if you shoot another .45ACP or 10mm Glock, you can enter that class as well, and self limit your magazines to 6 shots each, plus one in the chamber.

Scoring is based on time, with penalties assessed for errant shots or misses. The match uses three kinds of targets – the NRA D-1 target, also called the Tombstone; steel pepper poppers; and 6 inch steel plates.

For the metal targets, scoring is easy. If you knock the popper or the plate down, there is no penalty. If you leave one standing, you add 10 seconds. Ouch.

For the Tombstone targets, all shots in the A or B area incur no penalty. Shots in the C area add 0.5 econds for each, and shots in the D area count for 3 extra seconds each. Complete misses add 10 seconds. Ouch.

Every match I’ve been to has included the same 3 stages, and they are run just about the same everywhere. I tried to find some good examples of these stages, but the best ones are actually on the GSSF website itself, which I liked above.

5 to Glock:

This stage is five Tombstone targets, spaced from 5 yards out to 25 yards. Sometimes these are in a straight diagonal, and sometimes they are staggered. The point here is to test transitions from target to target, and to test your ability to make the longer shots as well as the close shots.

This stage is shot three times. At the end of the stage, all three times are added up, and each target is assessed. There should be 6 shots on each target, and penalties are added accordingly.

Glock M

The stage is named for its similarity to the letter M. From left to right, there is a Tombstone target at 7 yards, a Tombstone at 15 yards, 3 pepper poppers at 11 yards, then another 15 yard Tombstone, and a 7 yard Tombstone. This stage is also shot three times, with only one popper being shot on each run through.

Here’s where a little strategy comes in. I generally shoot all the Tombstone targets, left to right, 2 each, then shoot the pepper popper. This means I’ve shot 8 shots, leaving me three shots to knock the popper down. If I leave a popper standing, then it’s my fault, but I’ve never left a popper standing.

Glock the Plates

This is the simplest stage of all – just 6, 6 inch steel plates, at 11 yards. Knock them all down in the shortest time. This stage is shot four times.

But, as is often the case, the simplest stage is not necessarily the easiest. I have probably left more plates standing in my GSSF career than any other. For me, this stage embodies all the fundamentals of good shooting – sight picture, trigger control, and follow-through. When I get all these where they should be, and my shot cadence is right, I clean this stage. My technique is to shoot each plate in order, whether I hit it or not, then come back and take the ones I miss.

GSSF can be an excellent entry into competitive pistol shooting, and it is also a great complement to other shooting games for more experienced shooters. If you own a Glock, give them a look. For that matter, sign up, and come shoot with me next Saturday, July 16, at the Riverbend Gun Club in Canton, Georgia.

Lessons Learned and Re-learned

Courtesy of Warren Tactical

Writing this blog has forced me to look at my shooting techniques in black and white terms. One thing I am confronting is the lack of actual training I have gotten, and how my shooting has suffered as a result. It’s one thing to read in a forum or see on TV how something should be done, and another thing altogether to realize I am not doing it that way.

For 18 plus years I was a self taught shooter. I taught myself a lot of things that I’ve found out not to be the best way. Notice I don’t say these techniques are “wrong,” because I managed to shoot decently. But, I know now I would have shot a lot better if I had done things the other way. That’s the reason for my post the other day about bullet orientation in my magazine pouch. If there’s really a better way I want to use it.

Today I’m writing about the biggest mistake I made, and how I fixed it. And boy, has it made a difference.

Drum roll.

Until recently, I didn’t really look at the front sight.

I started out focusing on the target, and the gun’s sights would be blurry at best. Because I was shooting competitions where the targets were at 3 to 15 yards, it’s how I did it, and I got away with it. My shots were mostly As and Bs on an IPSC target, with Cs on the far targets. Sometimes I would have complete misses, and I was at a loss to tell you why.

Yes, I always heard teachers say “focus on the front sight,” but I didn’t think I needed to do anything different.

Then, about two years ago, I was watching the Pro Tip on an episode of American Shooter. KC Esubio was talking about calling your shots. To me this was a foreign idea at best, but he was using a helmet camera that actually focused on the front sight. I could see the rear sight alignment great, and the target was somewhat fuzzy, just like I had heard it described.

Then he shot a string of fire and told us to call his shots. I was surprised – I could tell exactly where the sights were aligned when the front sight lifted. I called his shots.

So I thought, maybe I should start focusing on the front sight, and maybe I could call my own shots, and figure out why I was missing targets.

There was a problem, though. Thanks to presbyopia, “old eyes” for you young whipper snappers, I physically couldn’t focus on the front sight. I wear contact lenses that give me good vision at normal distances, but I’ve had to wear reading glasses for the last 12 years or so. Even with my glasses, I couldn’t make something that close come into sharp focus.

So I got an idea. The next time I went for my annual eye exam, I asked the optometrist to help me out. He isn’t a shooter, but he understood what I wanted. He ended up giving me a sample contact for my right (dominant) eye that corrects it to 20/20 at arm’s length. Suddenly, my fingernail was in focus at arm’s length. The rest was up to me.

It was harder than I thought to train myself to look at the front sight. But to make it easier, I changed my sights on my competition pistol to a set of Sevigny competition sights with a fiber optic front sight. The difference has been amazing.

The first competition I shot with the contact in was the GSSF Annual Shoot, and it was my best GSSF match ever. Before this, my personal best was four misses in a match. This time I had only one miss, and I even called that one when it happened, and I knew I had jerked the trigger when it happened.

This contact has lasted me over a year, since I only wear it for about 6 hours at a time a few times a month. And, at my annual visit this year, my optometrist gave me another sample that I can use when this one wears out.

So, what’s next in my rebuilding of my technique?