Safety Rules In Depth – Rule 3

Is that what how they taught you?


RULE 3 – Keep your finger OFF the trigger until your sights are on the target.

This would seem as straightforward a gun rule as one could imagine. Since the way to make a gun fire is to pull the trigger, if you don’t want to shoot something, don’t touch the trigger.

Sadly, even a casual search of news reports and videos on Youtube show this to be the most violated safety rule of all.*

“But Rooster,” you say, “we see it all the time. What about when someone drops a gun, and it goes off?” After all, in movies or on TV, if you drop a gun, it goes off. If you drop a machine gun, it fires until the clip magazine is exhausted.

Every.

Time.

Fortunately, that image is a load of steaming dung, straight from my old horse Bo.

The design of modern guns has advanced to the point where the only way to get them to fire is to pull the trigger. They won’t fire if you drop them, or hit them, or kick them. They don’t “go off.”

Yes, you will read in news reports that a dropped gun fired – Google it yourself – but when you read those reports, you find one of two things present. First, the gun involved is some kind of older gun, like a derringer or Colt SAA. Yes, older guns like the Colt Single Action Army will fire if the hammer is struck from the outside. Even some older 1911’s will fire, unless the firing pin has been replaced with a lighter version.

The second possibility is the person involved is lying or has no idea what they are talking about. That”s because the trigger was pulled. Period.

++++

It follows then that the way to prevent guns from firing except when you want them to fire is not to pull the trigger. For the shooter, this means keeping your finger off the trigger until you are sure the gun is pointed at what you wish to shoot.

Now, since positive reinforcement is much better at altering behavior than negative reinforcement, let’s turn that around.

RULE 3 – When the gun is aimed at the intended target, then it’s safe to put your finger on the trigger.

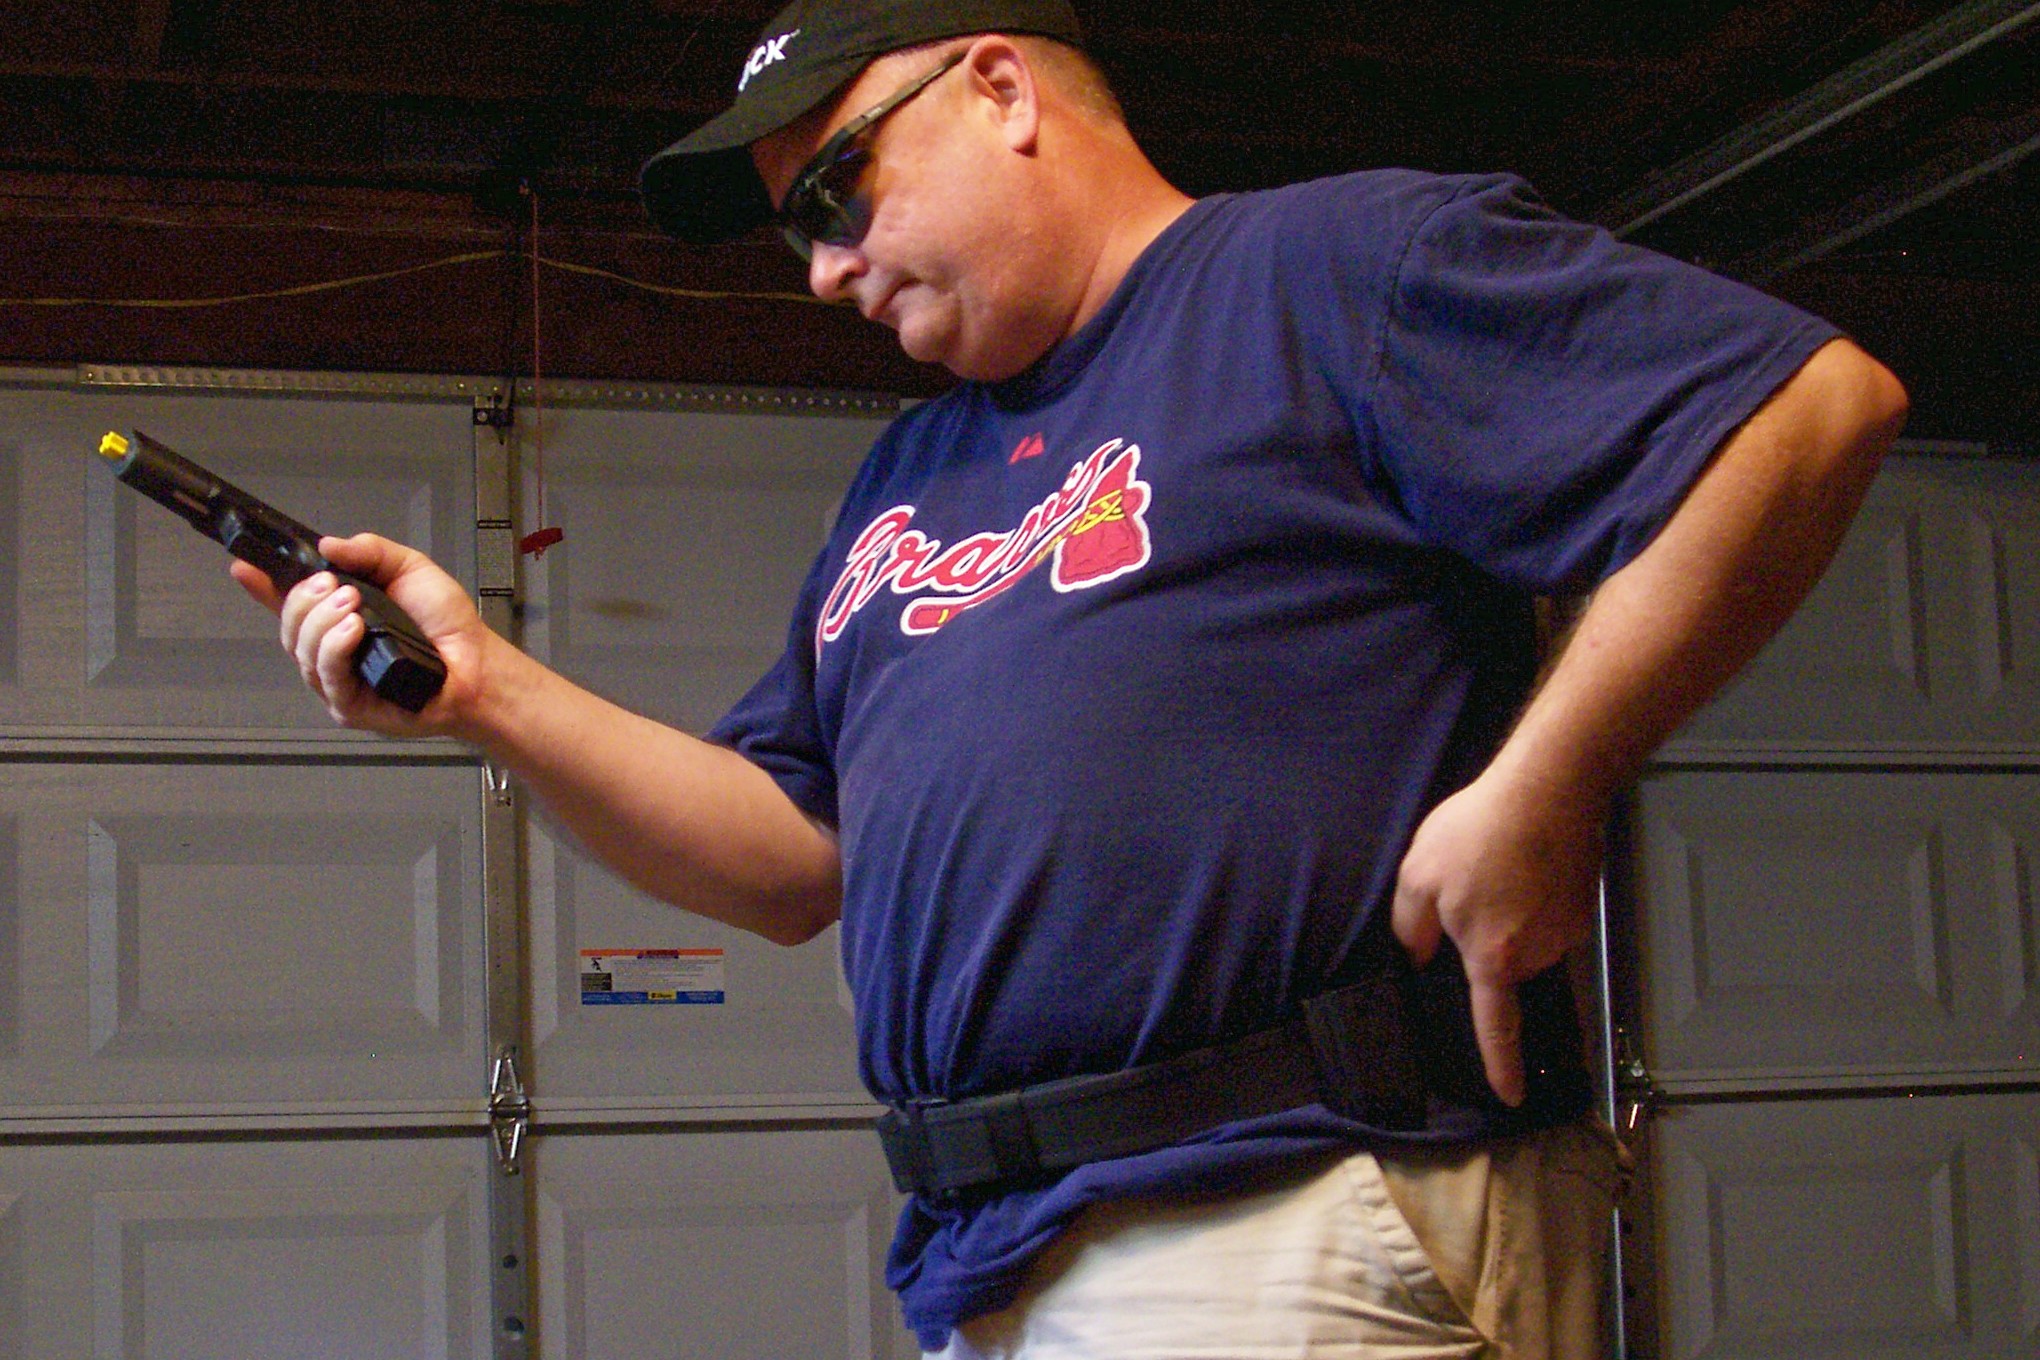
Until then, put your finger on the frame alongside the trigger. For instance, find a spot like the front of the trigger guard, or the slide lock, as a tactile reference, like this:

Rule 3 – using the trigger guard or slide stop as tactile references

Or, you can find other tactile references. Then, train yourself to use them.

What about resting your finger lightly on the trigger, like Jack Bauer, until you’re ready to shoot?

Sadly, when we humans are startled, we experience a flinch reflex, and we will pull the trigger. And the gun will fire. (And we will tell the newspaper reporter “The gun just went off.” And they will know we are lying. And they will print it any way.)

So, train yourself to keep your finger off the trigger, and index your finger somewhere else. And practice it.


And, for heaven’s sake, ignore the people in the movies or on TV.


* tied with Rule 1 and Rule 2.

Practice Makes Perfect, Part 2 – The Presentation

This is the second in my series of posts about practicing for competition. It is intended to lay out what a competitive shooter (me) can do to build muscle memory and improve pistol shooting. I should say by way of disclaimer that this isn’t a primer on practice for self defense – that will come in a later series. But a lot of the skills we will practice here will be useful for self defense, so this is where I start.

In competitive pistol shooting, seconds count. I’ve watched a lot of shooters at all levels, and one thing that separates the top shooters from the others is the time it takes to get the first shot off.

There are two parts to this – drawing the gun, and making the first shot. For some sports that start at a ready position not in the holster, like GSSF or Ruger Rimfire, this is distilled to the latter part.

I’m not going to go through the parts of the draw stroke, because a lot of people better than me have covered this in a lot better detail than I could. I suggest going to Youtube or Google and searching for “draw from holster” or similar.

BEGIN PRACTICE

Remember the mnemonic SPARSafety, Purpose, Action, Reflection. In this case, the purpose of the session will be to hone getting the pistol from rest to a first shot in the fastest time possible.

DRAWING FROM THE HOLSTER

To practice this, don your normal holster rig, and, if you’re practicing for IDPA, your normal cover garment. As with before, make sure your gun is unloaded, and all ammunition is removed from the room. This is especially vital if you will be practicing with magazines.

Starting with your hands in the desired initial position (relaxed or surrender) start out by drawing very slowly and intentionally, pressing out, and getting a good sight alignment. Press the trigger, and make sure the sights stay aligned. Concentrate on getting all the parts of the draw perfect. Speed is not the issue at this point.

Slowly increase speed until you are perfectly drawing as fast as you can. Then slow that  back to 3/4 speed for most of the session.

Perform this with as many different hand positions as you can think of. Work on these with both hands, and with your strong hand and weak hand alone. Remember, you will see this in a stage, as well as a classifier or qualifier.

STARTING WITH THE GUN SOMEWHERE OTHER THAN THE HOLSTER

Many USPSA stages start with the gun unloaded on a table or somewhere other than in the holster. So it make sense to practice this. I usually practice it several ways:

  • Standing, gun unloaded on a table. Grab the gun, insert a magazine, rack, press out to aim, and fire. Repeat.
  • Seated, as above.
  • Standing, gun unloaded on a table some distance away, magazine on a different table, some distance away. There are two ways to do this, grab the magazine first or grab the gun first. In a perfect world I grab the magazine first, but I practice it both ways, since I never know what sill come up in a stage.
  • Standing or seated, with the gun in a drawer. This one is used a lot in IDPA stages.

STARTING WITH THE GUN AT READY

I devote the most practice to this, because this move is the most versatile. Think about it – starting with the gun at ready, I press out to the target, aim, and fire. This is what happens at the start of a GSSF stage and a Ruger Rimfire stage, but it’s also what happens every time I move from one shooting position to another in USPSA or IDPA.

This is where I have cut out the most wasted time, and I’ll share with you how. Watch a lot of shooters and you will see this: from ready, they press the gun out, bring it up to eye level, overshoot, bring it back down, overshoot, bring it back up, get the sights in alignment, and shoot.

What you see if the gun going out, then up, then bobbing up and down a few times until it stops. Then, they take aim, and fire.

What I learned to do is to bring the gun up to eye level as I press it forward. When it gets to eye level, I am still pressing out, and I am aligning the sights. Once the arms are extended, the sights are aligned, and I fire. Using a shot timer, I can go from ready to a first shot on target in less than a second. The key is to start aiming as the gun goes forward, and when the sights are on the target, fire.

As before, work on these with both hands, strong hand and weak hand.

PUT IT TOGETHER

Once you are comfortable with all these parts, put together a practice session, based on your upcoming competition. Here’s an example:

  1. From ready, press out, fire. Start slow and work up to full speed. 20 reps.
  2. From ready, strong hand, press out, fire. 10 reps.
  3. From ready, weak hand, press out, fire. 10 reps.
  4. From holster, draw, press out, fire. Start slow and work to full speed over 10 reps.
  5. From holster, draw, press out, fire, strong hand. 10 reps.
  6. From holster, draw, transfer to weak hand, press out, fire. 10 reps.
  7. Unloaded gun on table, standing: insert magazine, rack, press out, fire. 10 reps.

Again, there are countless permutations, and you can customize them to the matches you are shooting, and to the areas of your game you know need improvement.

REFLECTION

Now, as you put away your gun and holster, make note of what went well in your practice session. I like to keep a journal, and keep track of the drills I’ve worked on. When I find I have trouble with one, I can track my improvement, and make sure it gets fixed.

Next time: Sight Alignment and Trigger Control

Practice Makes Perfect, Part 1 – The Practice Mindset

This is the first in a series of posts about practicing for competition. It is intended to lay out what a competitive shooter (me) can do to build muscle memory and improve pistol shooting. I should say by way of disclaimer that this isn’t a primer on practice for self defense – that will come in a later series. But a lot of the skills we will practice here will be useful for self defense, so this is where I start.

THE PRACTICE MINDSET

In order to improve, we must have a devotion to practice, to instruction, and to being honest with ourselves. I read once that human skill, be it shooting or brain surgery, is like the tide – it is either coming in or going out, but it never stands still. You can’t rest on your laurels. So, we must practice, or we lose the skills we have built.

The purpose of practice is to develop skills and muscle memory, so our bodies react automatically, rather than forcing us to do them consciously. But, the key here is to perform them correctly – all the practice in the world is of no use, and in fact, is self defeating, if done incorrectly. It’s better not to practice at all than to do so in a sloppy way, or without thought.

Yogi Berra once said that baseball was 90 percent physical, and the other half, mental. Shooting is like that, only more so. Your mind has to be involved in practice, as it is in the stage.

Do what you need to do to focus. If you are easily distracted by noises in the house, wear your ear plugs or muffs. I wear shooting glasses, especially when practicing sight alignment, so they practice is as close to real as I can get.

Here is my practice routine, which I remember by a little acronym: SPAR – Safety, Purpose, Action, Reflection.

Safety

The safety preparations for practice depend, obviously, on whether this is dry fire practice or live fire practice. Let’s consider both.

Dry Fire

All dry fire practice in this series will be with an unloaded gun, with all ammunition removed from the are where we are practicing. Any practice with individual pieces of ammunition will be done with snap caps.

I can’t stress that enough.

Every dry fire practice session in this series is to be completed with an unloaded gun. Unload the gun, double check that it is unloaded, and remove all ammunition and loaded magazines from the room.

I even go so far as to remove the barrel from my Glock 17 and replace it with a 5.11 plastic training barrel. This makes my Glock inert. Fifteen dollars buys a lot of peace of mind in this case.

Nothing is so tragic as a negligent shooting, especially one that could be prevented by simply following these rules.

Live Fire

For live fire practice, we follow the normal shooting safety rules, including any rules that are particular to the range where you are shooting.

In any case, never practice an unsafe act, as a means to make the practice “better.” Remember, you will perfect what you practice, and if you practice safety, you will get better at it.

Purpose

One of Steven Covey’s 7 Habits of Highly Effective People is “Begin with the end in mind.” In that vein, know what you are trying to accomplish in each practice session. I’ve found that it’s better, especially for dry fire practice, to have several short practice sessions, say, four sessions of 5 minutes, rather than one long 20 minute session. First, I avoid fatigue (both physical and mental), and second, I find they are easier to find time for, so I don’t put them off.

Verbalize and visualize the practice theme, and the session ahead. Know your goals.

Action

Practice makes perfect, so perform the practice perfectly. That sounds trite, but it’s true. I start out very slowly, and perform each movement perfectly. Then, I increase the speed, only so much as I can maintain perfection. I work up to about 3/4 speed and keep it there, honing muscle memory. Only at the end of the session do I increase to full match speed.

Keep in mind the goal of the drill, and acknowledge yourself when you reach it. Positive reinforcement is a powerful thing.

It’s important to acknowledge where we fall short, too, and improve it by reverting to slow perfection.

Reflection

At the end of the session, review the goals of the practice, and make notes. I find a practice journal is helpful, as much to keep up with what techniques I’m practicing, as to track improvement. If you find a particular drill cumbersome or not helpful, try to find out why, rather than abandon it. I’ve found that the problem is usually more with me than with the drill.

++++

Next time: Presentation

Practice Makes Perfect

Image
Practicing magazine changes in my garage, with a training barrel installed.


Time to come clean.

I played a lot of baseball in my youth, and one thing I learned was that it took practice – practice to improve, practice to win, heck, practice just to stay even. I liked baseball practice – fielding, batting, throwing, running the bases. And I got better and better every season.

I also played a season of youth football, but I quit after the first season, not because I didn’t like the sport, but because I hated practice. We did so many things that seemed to have no bearing on the game of football.

In my shooting career, I’ve seen improvement from time to time, and it usually came when I practiced. Nothing surprising there.

About ten years ago I read a book called Mastery, by George Leonard. George took up the martial art of aikido at age 47, and went on to become a black belt, and open his own dojo. In the process of becoming a black belt, he studied and then wrote about the process that humans go through when they learn and master any skill, from sports to career to marriage. Without reviewing the whole book, he found (and my experience confirms) that humans learn in spurts. In between these growth spurts, we are on a plateau, until practice and training enable us to reach another growth spurt.

This past week I decided to get the book out again, after hearing Michael Bane talk about it on one of his old podcasts. Two things became immediately obvious to me.

First, despite anything I’ve written in this blog, I am, sadly, merely a Hacker when it comes to shooting. I have worked on my shooting, and improved, but I have reached a plateau, as George Leonard predicted. Sadly, I have somewhat accepted this plateau, and I am most of the time content to compete at the level I am at.

Second, if I am going to shed this Hacker status, and truly improve – move up in USPSA, win a match, learn new techniques – I am going to have to devote myself to practice. I am also going to have to get a coach, someone who can show me where I am lacking, correct mistakes, and hold me to my program.

Fortunately, through contacts I’ve made since I started this blog, I have access to the tools, drills, coaches, and techniques that I will need. I have the time and the desire. All that is lacking is the doing. Practice.

I am currently putting together my practice plan, and in the coming weeks I will share it with you. In the meantime, I welcome suggestions.